Printable Version of Topic
Click here to view this topic in its original format
Armed Assault Info Forums _ Addons - Work in progress _ Glass Tutorial
Posted by: ObmaR Nov 15 2007, 01:47
Due to the amount of requests for help from the community and modelers regarding O2 modeling. I am going to start posting some basic and small O2 modeling Mini-Tutorials in this Section
The first tutorial:
Virtual Reflective Glass.
I have put together a basic folder to be used with this
tutorial. Please download http://www.armedassault.info/_hosted/bushwars/tuts/glass.rar and unpack to your models working folder in Oxygen 2 PE
Folder contains 6 files
glass_ca.paa
glass_ca.tga (targa copy for editing purposes)
reflect_co.paa
reflect_co.tga (targa copy for editing purposes)
reflective_glass.rvmat (material file)
glass-pass2.rvmat (material file)
These files can be used as a basis to apply reflective glass effects to all your models.
STEP 1
Open the model you want to apply the reflective glass to in the Oxygen 2 PE editor.
STEP 2
Apply the glass texture to the polygons you want to be glass or transparent, you can use the texture I have made (glass_ca.paa) or any other glass texture you want to use for your model.
HINT: I normally seperate my mesh with the polygons I want to use as glass and give it a name in the "Named Selection" eg -glass. It is easier to work with when I apply the glass texture to the selection.
Now the texture is applied and the selection is transparent but does not look like glass yet.
STEP 3
Go to the folder where you unpacked the glass.rar file and open the reflective_glass.rvmat file with the Material Editor or by double clicking on the file. A Material Editor screen will pop up as seen in the image bellow.
NOTE: if you opened the file in the Material Editor by double-clicking on it you have to press File/Open and open the file in the editor again otherwise you cannot edit it.
Don't know why it does that but seems to be a glitch with the software. Scroll down to the bottom of the material editor and only change the following entries.
a: is the specular power you want for you glass.
HINT: the lower the value the more reflective the glass becomes, play around with the setting using the slider to suit your requirements.
NOTE: do not change the stage config no 1 as this is the standard FresnelGlass setting used by the ArmA graphics engine.
b: Stage 2 is for a texture that will give your glass a reflective aspect of the environment around you. I have used the standard BIS one as bellow but you could actually make one to suit your environment. 
This is also a good way to apply reflection to your models rearview mirrors. Just change the UV texture from the glass one to a non transparent mirror type texture.
Click in the Source Name field and select the reflect_co.paa file from where you placed it in your model's work file.
c: This is the path to a material file (glass-pass2.rvmat) with an alpha pass. You can look at that file but do not change anything as that is a standard setting.
Click Browse and select the glass-pass2.rvmat file from where you placed it in your model's work file.
Save the file and close the material editor.
STEP 4
Open your model in Oxygen 2 PE and select the glass named selection or the selection you want to apply the reflective glass material file to.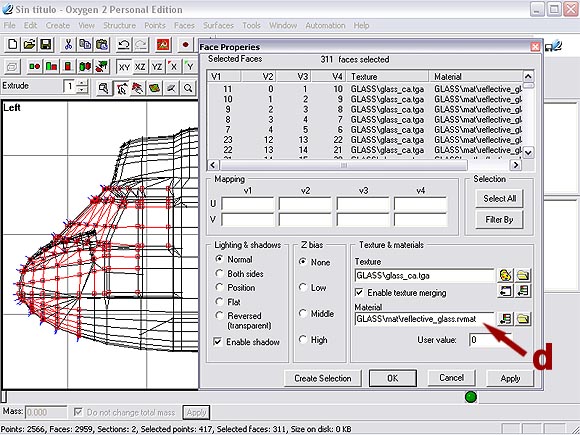
d: Click on the yellow folder on the right of the material field and select the reflective_glass.rvmat file from where you placed it in your model's work file.
Press Apply and then ok.
STEP 5
View the model with buldozer and there you have it lovely virtual reflective glass.
You can play around with the Specular Power settings as in step a: above to get more or less reflection off your glass.
Hope this tutorial helps and gives a little understanding of how the ArmA material files are applied.
Posted by: JdB Nov 15 2007, 02:03
Pinned and link posted in Tutorial Links topic 
Mirror those files Deadeye 
Posted by: Bence Nov 15 2007, 20:39
Bloody hell, thanks. This is usefull
Posted by: Deadeye Nov 15 2007, 21:06
Thx for the time
Added this one to our tutorial section, I also mirrored the pics and files (hope you don't mind)
http://www.armedassault.info/index.php?cat=articles&id=13
Good job !
Posted by: Linker Split Nov 15 2007, 23:12
yeah good tutorial m8
Posted by: Deadeye Dec 4 2007, 12:57
As Armed-Assault.de are down (atm) you can find the tutorial with images here :
http://www.armedassault.info/index.php?cat=articles&class=tutorials&id=13
Posted by: ObmaR Dec 5 2007, 09:45
links are fixed now, we moved hosts to armedassault.info so had to fix all links
Powered by Invision Power Board (http://www.invisionboard.com)
© Invision Power Services (http://www.invisionpower.com)